 Skip to content
After experiencing water damage, tackling mold growth effectively is vital for your home’s health. You need to understand the risks and take immediate action to prevent further complications. By evaluating the damage, using the right tools, and implementing proper cleaning techniques, you can mitigate the mold issue. However, knowing when to call in professionals can make all the difference in ensuring a thorough resolution. Let’s explore the essential strategies you should consider.
Key Takeaways
- Conduct a thorough assessment to identify affected areas and document findings to guide the mold removal process.
- Equip yourself with safety gear, including gloves, masks, and goggles, to protect against mold exposure during removal.
- Utilize a systematic approach for remediation, including containment, removal, and thorough drying of affected areas.
- Use essential tools like a HEPA vacuum, scrub brushes, and cleaning solutions, such as vinegar or specialized products, for effective mold removal.
- Monitor humidity levels post-removal with a moisture meter, maintaining indoor humidity below 60% to prevent future mold growth.
Why Mold Growth After Water Damage Is a Serious Problem
When your home experiences water damage, you mightn’t realize that mold growth can become a serious issue if not addressed promptly.
Mold isn’t just an unsightly problem; it poses considerable risks to your health. Exposure to mold can lead to respiratory issues, allergic reactions, and other health complications, particularly for those with pre-existing conditions.
Understanding mold health is vital, as it can affect every member of your household. To safeguard your loved ones, you must prioritize mold prevention strategies right after identifying water damage.
Quick action, such as drying affected areas and using dehumidifiers, can greatly reduce mold’s potential to flourish. By taking these steps, you foster a healthier environment, reinforcing your home as a safe space for you and your family.
Steps to Assess Water Damage for Mold Prevention
To effectively prevent mold growth after water damage, you must first assess the extent of the damage thoroughly.
Begin with a detailed water damage assessment to identify affected areas, including walls, floors, and ceilings. Use mold inspection techniques such as visual checks and moisture meters to pinpoint hidden moisture sources that could foster mold growth.
Pay special attention to dark, damp corners and areas around plumbing fixtures. Document your findings to help guide your next steps and ensure nothing is overlooked.
By taking these proactive measures, you’ll protect your home and create a safer environment for you and your loved ones.
How to Safely Remove Mold at Home
When you’re ready to tackle mold removal at home, it’s essential to equip yourself with the right safety gear.
This includes gloves, masks, and goggles to protect yourself from spores.
Following a step-by-step removal process will ensure you address the issue effectively and safely.
Essential Safety Gear
Before diving into mold removal, it’s crucial to equip yourself with the right safety gear. Start with protective clothing to shield your skin from mold spores and potential allergens. A long-sleeved shirt and pants, along with gloves, create a barrier against direct contact.
Next, don safety goggles to protect your eyes from irritants that can be released during the removal process. This gear safeguards your health and boosts your confidence as you tackle the task.
Step-By-Step Removal Process
Proper mold removal involves a systematic approach that can greatly reduce health risks and prevent recurrence.
Start by evaluating the situation with effective mold inspection techniques to identify the extent of the contamination.
Once you’ve located the mold, follow these steps for safe remediation:
- Containment: Seal off the affected area to prevent spores from spreading.
- Removal: Use appropriate remediation methods to eliminate mold, such as scrubbing surfaces with a mixture of water and detergent. For porous materials, discard items that can’t be cleaned.
- Drying and Monitoring: Thoroughly dry the area and monitor for any signs of mold returning.
Must-Have Tools for Successful DIY Mold Removal
A successful DIY mold removal project hinges on having the right tools at your disposal.
Start with a high-quality respirator mask and protective gloves to keep yourself safe from mold spores. You’ll need a sturdy scrub brush for scrubbing surfaces and a vacuum with a HEPA filter for capturing tiny particles.
Essential cleaning solutions include a mixture of water and vinegar or specialized mold removal products; both effectively eliminate mold. A spray bottle helps apply these cleaning solutions evenly.
Don’t forget a moisture meter to monitor humidity levels, ensuring an ideal environment for mold removal.
Having these tools on hand simplifies the process and empowers you to tackle mold issues effectively and confidently.
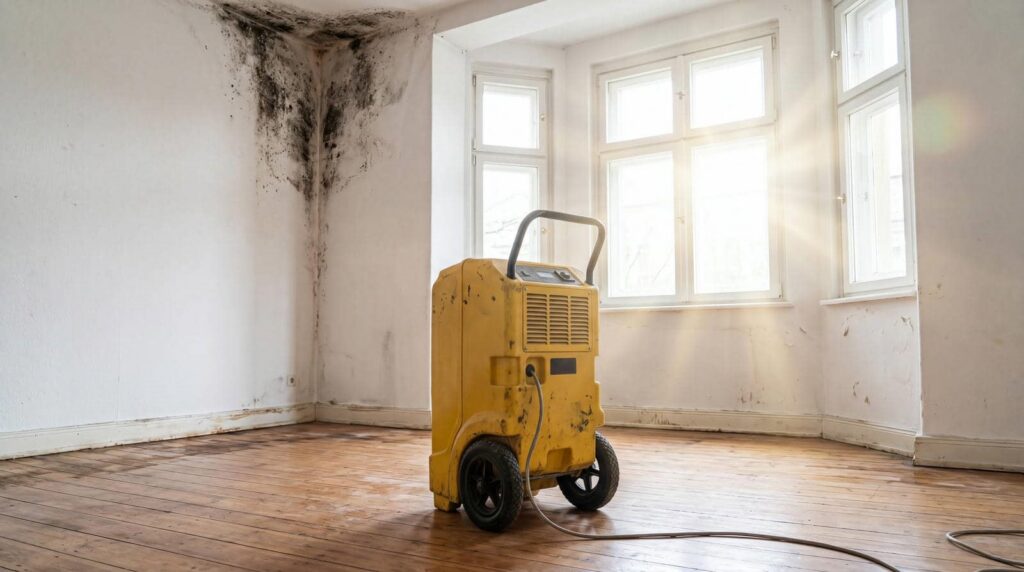
Drying and Dehumidifying After Water Damage
After water damage, rapid drying is essential to prevent mold growth and structural damage.
Using dehumidifiers effectively can greatly reduce moisture levels, while proper ventilation techniques enhance the drying process.
Understanding these methods will help you manage the aftermath of water exposure efficiently.
Importance of Rapid Drying
When water damage occurs, rapid drying is essential to prevent mold growth and structural damage.
You need to implement effective drying techniques and ensure rapid moisture control to safeguard your home.
Consider these key strategies:
Increase Airflow: Use fans and open windows to circulate air and speed up evaporation.
Use Heat: Adjust the temperature in the affected area; warmer air holds more moisture, promoting quicker drying.
Remove Wet Materials: Take out soaked carpets, insulation, and other materials to minimize moisture retention.
Dehumidifiers and Their Use
Effective drying techniques are only part of the equation in combating water damage; dehumidifiers play a pivotal role in controlling moisture levels.
Understanding dehumidifier types is essential for maximizing dehumidifier efficiency in your space. Portable units are great for smaller areas, while whole-house dehumidifiers are designed to cover larger spaces effectively.
When selecting a dehumidifier, consider the unit’s capacity measured in pints per day, which indicates how much moisture it can remove. Additionally, look for features like built-in hygrometers and continuous drainage options to enhance efficiency.
Ventilation Techniques for Drying
While dehumidifiers are essential for moisture control, effective ventilation techniques are equally crucial for drying out spaces affected by water damage.
You can enhance drying processes through two primary ventilation methods: natural ventilation and mechanical ventilation. Here’s how to implement these techniques:
Natural Ventilation: Open windows and doors to allow fresh air to circulate, helping to reduce humidity levels naturally.
Mechanical Ventilation: Use fans to increase air movement and promote evaporation. Position them strategically to direct airflow towards damp areas.
Combination Approach: Employ both methods simultaneously for best results, ensuring that air flows freely and moisture is effectively removed.
When Should You Hire Professional Help for Mold Removal?
How can you tell if it’s time to bring in professional help for mold removal?
If you notice extensive mold growth—covering more than ten square feet—it’s best to seek professional services.
Additionally, if mold is present in hard-to-reach areas, like behind walls or in HVAC systems, you’ll want experts who can safely handle these situations.
If anyone in your household has respiratory issues or allergies, the urgency increases; mold can exacerbate these conditions.
Finally, if you’ve attempted DIY mold removal without success, don’t hesitate to call professionals.
Their experience and specialized equipment ensure thorough mold removal, protecting your home and health.
Prioritizing safety and effectiveness is essential in tackling mold challenges.
Preventing Future Mold Growth in Your Home
What steps can you take to prevent future mold growth in your home?
Implementing effective mold prevention techniques is essential for maintaining a healthy living environment. Here are three key strategies to take into account:
- Control Humidity Levels: Keep indoor humidity below 60%.
Use dehumidifiers and air conditioning to help with air quality improvement.
- Ensure Proper Ventilation: Install exhaust fans in moisture-prone areas like kitchens and bathrooms.
This helps remove excess humidity and promotes air circulation.
- Regularly Inspect and Maintain: Check plumbing for leaks and repair any water damage promptly.
Regular maintenance can prevent hidden moisture that fosters mold growth.
Importance of Regular Post-Water Damage Inspections
After experiencing water damage, regular inspections become essential for safeguarding your home from mold growth and structural issues. You should implement a post damage checklist to guide your evaluations, ensuring no potential problem goes unnoticed.
These inspections help identify hidden moisture and areas where mold might thrive, allowing for timely interventions. The inspection frequency should be determined by the extent of the damage and local humidity levels, but a bi-weekly check in the initial months is often advisable.
Frequently Asked Questions
Can Mold Grow Behind Walls After Water Damage?
Yes, mold can grow behind walls after water damage. You need to focus on moisture control and mold prevention to minimize risks. Regular inspections and maintaining low humidity levels are essential in preventing mold growth.
How Long Does Mold Removal Typically Take?
Mold removal isn’t a snap; it can take days to weeks, depending on the mold removal timeline and factors affecting duration like severity, location, and how quickly you act. Don’t wait—tackle it head-on!
Is It Safe to Stay Home During Mold Removal?
It’s generally not safe to stay home during mold removal. Prioritize mold safety by evacuating and following home precautions. Exposure can lead to health issues, so ensure you’re in a safe environment until the job’s done.
What Are the Health Risks of Mold Exposure?
Mold exposure can lead to mold symptoms like sneezing, coughing, and skin irritation. You might experience allergic reactions, especially if you’re sensitive. Prolonged exposure can worsen these effects, making it essential to address mold issues promptly.
Can I Use Bleach to Remove Mold?
You can use bleach for certain mold types, but its effectiveness varies. It doesn’t penetrate porous surfaces well, so consider alternatives like vinegar or specialized cleaners for a more thorough mold removal approach.
Wrap-Up
Effectively tackling mold after water damage requires diligence and the right strategies. Have you ever imagined the hidden dangers lurking behind your walls if mold is left unchecked? By following safety precautions, using the right cleaning solutions, and ensuring thorough drying, you can safeguard your home. Remember, regular inspections can prevent future outbreaks and protect your health. Taking these proactive steps ensures a clean, mold-free environment for you and your loved ones.